Monday, November 12, 2012

Thankful Tree


We brought out our annual thankful tree and we'd love to invite you all to participate with us! Every November we set up our tree and decorate it daily, by writing something that we are thankful for on a paper leaf and hanging it up. It's such a fun way to remember all that we have and all that is beautiful in our lives. Finding something to be thankful for in every situation is good to practice every single day of the year, but it's especially appropriate this month as we get ready to celebrate Thanksgiving.

So what are you thankful for? 
I know I probably sound like a broken record by now, but what we are most thankful for at the store is definitely all of you. We have the most amazing customers and because of that, our business has been blessed beyond what we could imagine. So thank you for all of your support over the years.

Happy Thanksgiving everyone!


 “If the only prayer you said was thank you, that would be enough.” 


Friday, November 9, 2012

Acrylic Flow Release medium

Acrylic Flow Release is one of the paint additives created by Golden Artist Colors that I had yet to play around with. I knew only vaguely what it was for and I suspected that once I understood what it was capable of doing, it could very well be something that I might find useful in my own art. I did some reading on Golden's website and watched a few videos before I decided to experiment on my own. Below is a product description straight from Golden. If you'd like to read more or watch a video demonstrating it's use, you can follow the link here.

PRODUCT DESCRIPTION

GOLDEN Acrylic Flow Release is a surfactant. A surfactant is a concentrated surface-active liquid which reduces surface tension, thus improving wetting and increasing the flow of acrylic waterborne paints.
A surfactant is used several ways in acrylic paint making. Surfactants are used to "wet out" pigments to ease their introduction into an acrylic resin, medium or gel. They can also be added to thinner paint mixtures, such as stains, to help reduce surface tension.
Acrylic Flow Release is very useful for staining techniques, as it dramatically reduces the surface tension between the stain (paint/water) and the support. Certain supports, especially raw canvas, are inherently water repelling in nature and require the use of such a surface-active agent to allow the stain to wet and penetrate into the support.


 I decided to try the technique of mixing the  Flow Release with water and using it to coat the canvas before I poured on the paint for a wet-on-wet application.


Next I used Golden's airbrush paint for the color wash since it is already watered down to a very fluid consistency, perfect for staining effects.


To demonstrate how the paint reacts to the Flow-Release/water mixture I splashed a few drop of the paint onto my canvas. The dab of paint on the bottom was applied over the Flow Release and the dab of paint on the top is without Flow Release. As you can see, the Acrylic Flow Release dramatically brakes the surface tension and allows the paint to wet-out and absorb into the canvas instantaneously instead of balling up as usual. 
HOLY SCIENCE! ;-) 


Notice the bubbles in my Flow Release mixture above? This was caused by stirring the Flow Release into the water too vigorously. Next time I will be more careful to prevent this from happening. I tend to always do things the wrong way the first time around. This is how I learn, because reading the directions is just too painful!


Next I covered the entire canvas in my Flow Release mixture and then proceeded to squirt generous amounts of magenta, yellow and white airbrush paint over the top.


Lastly, I used the end of a brush to swirl the colors all together, sort of creating a marbled effect as you can see. I then lifted the canvas and rotated it, allowing the paint to drip and spread out until it covered the whole surface area.


I LOVE how it turned out and I think this is a fantastic way to create an interesting base for a painting and I'm sure i'll be using this technique again soon.


Here is an up-close of the marbled paint. After everything, all I had to do was lay it flat to dry untouched... which is easier said than done when you live with a two year old. I would show you the finished product but needless to say, it now has the addition of several finger prints, scratches and even part of a foot print  (not even joking). 

Hopefully you found this little experiment of mine useful, and if not, I hope it at least inspired you to experiment with a new medium you've never explored before. I was really fascinated with what I could do using the Flow Release medium and I'm sure i'll be using it again in the future. A couple of things that I think are very important to be aware of with this product is to remember that it is VERY concentrated and your paints will become tacky and unable to dry completely if you add too much, so use the proper mixing ratio that is stated on the label. Also, remember not to mix too vigorously! Nobody wants to deal with those pesky bubbles in their art.

Happy painting &
Thanks for reading!

-Heather @ IBF

Monday, August 13, 2012

Paper Love!

Great news for all you fellow paper lovers!
In a few weeks we will be receiving a big order of new papers. The majority of them will be discounted at $1.50 each per full sized sheet! 

We also have tons of really great scrap bundle sets that are priced anywhere from $1.99-$4.99.
These scrap bundles are a great way to get a variety of different decorative papers for those little projects like scrapbooking, card making etc..

Because I get asked fairly often by customers at the store..."What do you do with all these pretty papers?"
 I thought i'd include a little project that is fun, quick, easy and a great way to use up your scraps!

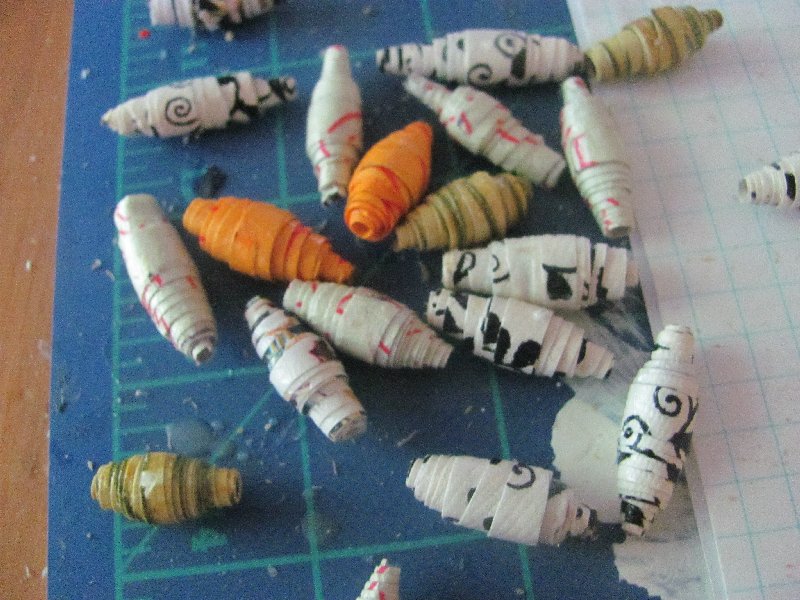
DIY Paper beads

1. What you'll need.
Toothpicks. Acrylic Gel Medium (I used Golden's Regular gel gloss.) Mod Podge will also work fine. A ruler. Cutting mat. (not pictured) Scissors and a pen.

Grab an assortment of your favorite decorative papers. This project also works well using magazine pages. Keep in mind that the prints on the paper wont really show on the final product, it's more about the color selection.

2. Draw out your bead shapes.

Using your ruler and a pen, draw vertical lines on the back of your papers, alternating the ruler at a slight angle to create a long triangle shape. The width of the bottom of the triangle shape will wind up being the width of your bead so keep this in mind when mapping out your cutting lines. you can make the width shorter or longer depending on how you want your bead to be shaped. Also, the strips should be at least a foot long,. The length of the paper strip will adjust the thickness of your bead.

2. Cut them out!

Cut your paper where you drew your lines. Your paper should wind up in strips like this. Be sure to use papers that vary in design and color so you wind up with a bunch of bright and unique beads.

3. Roll them up!

Starting with the longest side of your paper strip, begin to roll the paper onto the toothpick as tightly as you can. Once you've rolled it a few times around nice and tight, apply the acrylic gel to the inside of the remaining paper strip like an adhesive and roll it up the rest of the way. When it's completely rolled up it should resemble the picture above.

4. Cover with Gel medium.

Apply a generous amount of Acrylic gel medium all over your bead, making sure to cover to the entire thing. 

5. Last step!

Pull your paper bead off of the toothpick while it is still wet. Place it in a safe place and allow it to dry!

There you have it!

Once they're dry, they're ready to be strung into a pretty bracelet, necklace, earrings or whatever you'd like to make!

ENJOY!


Tuesday, July 17, 2012

Home made clay recipes.


CLAY RECIPES
From clayrecipe.net

Cinnamon Apple Clay Recipe

Simple but great smelling clay recipe. Add some food coloring to make the clay stand out a bit more (or don’t, up to you).

1 cup applesauce
1 cup flour
1 cup cinnamon
1/2 cup white glue


Food coloring

Mix all the ingredients together until smooth. Add food coloring if wanted. Put the clay in the refrigerator for a few hours until firm.


Coffee Clay Recipe

Would you like a clay with an amazing scent? Then the coffee clay recipe is for you. Enjoy the coffee scent while your creations are baking in the oven.

4 cups flour
1 cup salt
1/4 cup instant coffee
1-1/2 c warm water

Dissolve the instant coffee in the warm water. Using another bowl, mix flour and salt. Make a hole inside the flour mixture and add 1 cup of coffee water into it. Mix with your hands until smooth. If needed you can add more coffee water.

Create the designs you want and bake in the oven for about 1 hour (until hard) at 300 degrees.


Edible Clay Recipe

Why stop at making and playing with the clay? Might as well eat it. Luckily this clay recipe tastes good.

1/2 Cup Light corn syrup
3/4 Cup Peanut butter
1/2 Cup Soft margarine
1/2 tsp. Salt
1 tsp. Vanilla
1 Cup Sugar
1 Cup Flour

Mix all the ingredients and knead into a smooth, well tasting clay. Try not to eat all of it at once, atleast not until after dinner ;)


Glittery Clay Recipe

Want a clay recipe that sparkles? With some glitter added to the clay, Disco fever is brought into clay making.

Glitter image

1 cup flour
1 tbsp. vegetable oil
1 cup water
1/2 cup salt
2 tsp. cream of tartar
Glitter

Mix all the ingredients in a cooking pot and heat, stir constantly until ball forms. Knead until smooth. Store in airtight container. For improved result, knead while listening to Disco music.


Vanilla Clay Recipe

This recipe makes for a delightful vanilla smelling clay recipe. The taste is sadly not as delightful as the scent.

1 cup flour
1 tbsp. vegetable oil
1 cup water
1/2 cup salt
2 tsp. cream of tartar
vanilla extract

Mix all the ingredients in a cooking pot and heat, stir constantly until ball forms. Knead until smooth. Store in airtight container.


White Bread Clay Recipe

A clay recipe based on white bread dough. I would like to point out that it’s not edible in any way due to the glue, if eaten anyway, best of luck.

White Bread

6 pieces of day-old, white bread
3 Teaspoons white glue
2 Teaspoons Water

Remove crusts from bread, and cut the remaining into small pieces. Use a large mixing bowl to add water and glue to the bread pieces. Knead the mixture with your hands until it has the consistency similar to pie dough.

When done the clay can be rolled out on newspaper and cut with a cookie cutter or perhaps rolled into beads. Allow to drie when shaped as desired.


No-Bake Clay Recipe

Many clay recipes requires some form of baking, this does not. The clay can easily be colored or the natural color can be kept. If you choose to color the clay, it can still be painted or sealed with polish when modelled.

1 cup cornstarch
1 1/4 cups cold water
2 cups baking soda (1 pound)
Food coloring (optional)
Tempera or acrylic paints (optional)
Clear shellac, acrylic spray, or nail polish

Combine cornstarch, baking soda and water in a saucepan; stir over medium heat for about 4 minutes until mixture thickens to a moist mashed-potato consistency. (For a fun colored clay, add a few drops of food coloring to the water before it is mixed with cornstarch and baking soda.)

Then remove from heat, turn onto plate, and cover with a damp cloth until cool. When cooled, knead until smooth.

Jewelry Clay Recipe

This is a fun recipe which allow your kids to create jewelry treasures! Easy and simple clay recipe, but very appreciated.

clay beads

1/2 cup cornstarch
1/2 cup flour
1/2 cup salt
warm water

Begin with mixing all the dry ingredients. After that, slowly add warm water (not boiled) until the mixture sticks together and can be shaped.

To begin the jewelry creation, roll the clay into small balls, pierce the balls with toothpick or a thick nail (if you intend to string the beads), allow to dry. When dry, paint as desired and once again allow to dry.

Paint or spray paint balls with acrylic finish to seal off. After finish dries, string beads on jewelry thread, invisible fishing line, elastic cording or just place all the jewelry in a treasure chest (if desired, bury in the backyard for safekeeping).


Basic Modeling Clay

Basic but functional clay recipe. Based on easy to find and cheap ingredients.

1/2 cup potato starch or corn starch
1 cup salt
1 cup boiling water

Boil the mixture until its texture reminds you of a soft-ball, then use a waxed paper to knead on. To keep the clay moist, you can place it in a air-tight container and wrap a wet cloth around it.

After modelling, the products should be allowed to air-dry. The pieces can be painted after drying is complete.


Peanut Butter Clay Recipe

This is a very simple and edible clay recipe. The clay making can be an excellent excuse just to get something snaxy.

1 part peanut butter
1 part dry powdered milk
Honey

Mix the peanut butter and dry powdered milk. Slowly add the honey until desired consistency is achieved. If the mixture is too sticky, add more dry milk. If it’s too dry, add more honey.

Then it’s just to let the creating (and eating) begin. It will be appreciated by the kids in the family.

Monday, July 16, 2012

Summer fun for the kids

    I just wanted to share some links to great project ideas for the kiddos since it's that time of year where they are home from school on Summer break and constantly needing something to keep busy. It can be difficult sometimes to come up with ways to spark creativity and keep them away from the television and computer, not that those kinds of activities aren't OK, but everything in moderation, right? What are some fun things you do with your kids over the Summer? If you have any great art project ideas for the littles you'd like to share... Please do!

  -Heather @I've Been Framed.


Check out our Pinterest board for the links to fabulous ideas!

Also, drop by the store for some supplies and grab a free home made clay recipe flyer at the front counter!

We have ALL KINDS of fun stuff for kids at the store.


Air dry and oven bake clays
Pom poms
feathers
 Glitter
Finger paint
All kinds of paper
crayons
markers
glue
coloring books
paint by numbers
yarn
googly eyes
magnets
numbers and letters stencils and stickers
chalk board paint
sidewalk chalk
scissors
And the list goes on....


Thursday, May 24, 2012

DIY Paper Poms!

Lately, we've been a little obsessed with these paper poms at the shop. They're fun, they're bright, they're the perfect Summer decoration and they're surprisingly simple to make once you get the hang of it. All that you need is a pack of tissue paper, which you can pick up at your local art shop (wink wink). We currently have a great color selection at very reasonable prices. I've seen these poms used as a delightful pop of color in many situations such as; weddings, room decor, birthday parties, baby showers, patio parties and more! I also love that you can change the size and shape of these by using less or more tissue and by cutting the edges different ways.

Click the link for a tutorial of how it's done via Martha Stewart


Here's a few pics of the poms we've made at the store.

.